Table of Contents
Project Processor
Project processor can perform several tasks on multiple project files. These tasks include running scripts, removing backup files, cleaning, purging, swapping types and materials, renaming, addition of shared parameters, and manipulation of links.
Operate with caution! *When the tasks require the application to open the project files, they will also be upgraded to the version that is used to run Project Processor. This upgrade is irreversible. In addition, improper use of this tool may lead to significant loss of data. For these reasons, ensure that recent backups have been made and that the process is tested thoroughly prior to performing these operations on production files.*
Starting Project Processor
 Click the Project Processor button on the CTC Batch Suite panel located within the CTC Software tab
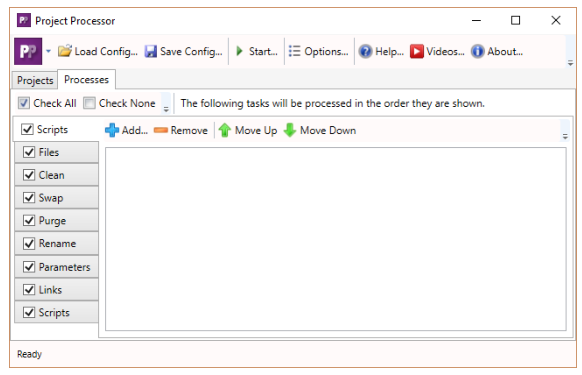
The Project Processor Interface
The main window is used to specify a project or projects to process as well as to select the processes to perform:
Choosing Revit Models to Process
While not necessary, it’s usually best to begin by selecting at least one project to process on the ‘Projects’ tab. This will populate the dropdowns with values that are read from the currently open project.Click the “Add Files…” button to select one or more projects in the same folder.
Use the “Add Folder…” button to process all model files in a single folder.
“Add Open Projects” will add the project(s) open in the current Revit session.
The .rvt models will be processed in the order in which they appear in the list.
It is important to ensure that none of the files are open in Revit when the batch begins. If a file is open, some file tasks and scripts may fail; open files will not be saved and will be left open after processing.

If a file is inaccessible at the time the batch is run, it will be skipped and logged. The [process log](#process-log) will be displayed after the batch is run.
The model that is currently open in the Revit session can aid in the selections and definitions of the various processes to perform. It is helpful to use a models which represent or contain many of the conditions for which the processor will be run.
Each model will be saved if the processes is completed successfully and the file was not open when the process started. That means that any models of a previous version will be upgraded to the version used by Project Processor and will no longer be compatible with lessor year versions of Revit! Use extreme caution when selecting models and be cognizant of their Revit version year.
Each row in this window may represent a single file, or a rule that may apply to several files. Files or file collections in the list can be skipped by unchecking their checkbox in the ‘Active’ column of the list. This is useful for retaining file references for future runs.
To completely remove a file reference without moving or deleting the file itself, select it and click “Remove” or press “Delete” on the keyboard.
“Check All” and “Check None” applies to list of processes to run.
Loading and Saving Configurations
The projects and processes defined can be saved to a configuration file and later loaded again. This is extremely useful for repetitive tasks and provides an easier workflow for users that may not normally perform these types of tasks. The settings can be recalled and saved by using the “Load Config…” and “Save Config…” buttons. The configuration is saved in text file with an “.PPSettings” extension.
Process Tasks
The following tasks are executed in the order they appear in the main window. Most of these tabs can be reordered as required by the user.
Scripts
Scripts can be referenced and run in these panels (one at the start and another at the end) to perform “commands” using .bat or .cmd shell functions. A script might be used to copy files from one location to another, create a backup file(s), rename files after processing, add files to other folders, zip up an archive, etc. The script is run as the currently logged in user by default. To run as an elevated user, refer to the Windows administration sections on Microsoft’s website.
There is also a vast amount of community created sites and resources for Windows command scripting online.
Files
This tab defines a number of processes as well as how to process and what the resulting files will be. The subtabs of Files: Clean, Swap, Purge, Rename, Parameters and links can be ordered as desired by dragging and dropping them. This is useful when the order of operations affects the desired results.
To remove Revit’s automatically created backup files (.0001.rvt for example), check the first box. The process will only remove backup files associated to the selected models. To remove backup files that are not explicitly selected (but their main files are in the selection), check the second box as well. Additional options for the opening of workshared models define whether they are detached and audited. Check the box to Save Immediately if the detached copy must be saved before processing.
After processing, models can be resaved to a new location. In the Find text box, type or select the path from which the files should be saved in a new folder. The Replace text box defines where the qualifying files will be saved to.
Clean
Functions for finding and removing views, templates, view filters, sheets, file links, images and parameters. The grid contains built in parameters or properties to select by. The rules defined on the “Clean” panel apply only to the tab on which they are defined. For example, a rule with the discipline “Coordination” selected will remove only view objects matching that criteria. Further, If it is the first rule defined, it will be performed in that order. To define a selection rule, simply click the “Add” button at the top of the grid. To remove all of the drafting views with a name that begins with an “A”, the rule in the red box below is defined:

Other examples above follow similar patterns. Some name filters may include “Auto Fields” that are in fact parameter names enclosed in <>, such as <Level>. These are allowed where the text boxes have “<>” buttons next to them, and will be replaced with the parameter values, if they are found. If not, errors will be logged.
Again, use caution and ensure that prior backups are made as the actions performed are not easily (or at all) reversible!
Swap
This very useful feature can exchange dimension styles, text styles, line styles, fill patterns and materials for another. For example, if the project has a text style called Arial 10 that needs to be switched to another called Arial 12, the process will apply the “Replacement Style” to all objects referencing the Arial 10 “Text Style”. The user can also use wildcard characters in search; for example, text style of “Arial*” will apply to all text styles that start with Arial. In that case, the app will replace all such styles to “Arial 12.”

In the above example, the two style names were simply typed into the boxes. If the styles exist in the current project, they will be available for easier selection from the list.
Purge
Purge eliminates all of the checked object types from a model. It is similar in concept to the command in Revit but performs the action differently with nearly the same result. Use extreme caution with this feature as it may result in the unintended loss of data. Of course, if proper backup procedures are followed, the data can be restored.
Rename
This feature is most useful if the desired result is to simply add, remove or replace specified character patterns for the names of views, template views, view filters and sheets. This does not change other properties or apply other characteristics the way the swap function does.
As with the other processes, the grid cells which are shaded contain predefined lists of properties. The other cells in the row are dynamic and will allow a pick from the list of values found in the current project or typed-in values.

This allows the processor to search for, and attempt to match, names to change based on the property specified. If the rule does not match anything, it will continue to the next rule definition.
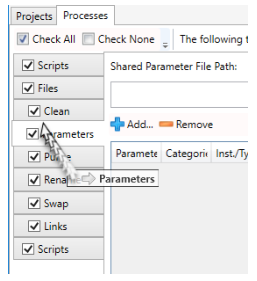
Parameters
If the shared parameter file path is specified, parameters and parameter groups can be selected here. To begin defining which parameters should apply to categories in the projects, click the “Add…” button.
In the window that appears, check the boxes next to parameters (or entire groups) in the left box and select one or more categories they should be applied to in the projects.

Choose whether the parameters should be instance (and if the values can vary within groups) or type based.

Click OK to return to process pane.
Notice that each selection creates a row for each parameter. Rows can be removed individually by selecting one or more (use CTRL+click or SHIFT+click) and clicking the “Remove” button. To view the entire list of categories, move the mouse over the category column; a tooltip window with the list of categories will be displayed.
When a new shared parameter is added, the user has options to choose an existing parameter to source the values from, add schedule columns where the source parameter appears in a schedule, remove the source parameter schedule columns, replace the source parameter in combined parameter schedule columns, and remove the source parameter if possible.

Repeat the same steps for each rule that should be defined. If a parameter that is to be added already exists in the list, it will replace the existing parameter with all its options.
Links
To change paths to links in models, define rules to perform the desired modifications by selecting the type of link, the path to find and the part or full path to replace. This can be useful if processing models in new locations.
To process links in workshared projects, check the box. By default, this needs to be enabled because changing links outside of the model will require all users to be “out” of the models and may cause the projects to be saved as a central in the new location.
Running the Processes
When the “Start…” button is pressed, the application begins the processes. During the operation, the session of Revit which is running the tool will not be available until the batch has completed. If the “Start…” button is disabled, it is usually an indication of the settings being invalid to proceed. By moving the mouse over this button, the list of errors will be displayed, which should be addressed for the button to be enabled.
Under some circumstances, error conditions may force the process to stop (due to Revit dialogs being shown). While this app attempts to dismiss such dialogs, some of them may still require user interaction. For example:

Viewing the Results
At the end of the operation, a log will be presented which can be examined and copied or saved for later review.
