Table of Contents
Content Management System
The CMS application can be used to manage file based content of virtually any type. The application does not require Autodesk software to use. The guide to using CMS for Windows can be found here.
The CMS addin for Revit, Civil 3D and AutoCAD supports versions 2021 through 2025. The full-featured CMS requires a subscription license on a per user basis. The guide to using the CMS for Revit and Civil 3D can be found here.
A limited feature version (CMS LT) is available to any user with a CTC Software User Account. The guide for the free account CMS LT can be found here.
Getting Started
In order to begin using the features of the CMS, some quick steps need to be taken.
Accessing the CTC Portal
Most of the administrative tasks are performed within the portal. The portal is our centralized web application for administration and analytics.
A CTC account is required to access the portal. This account is used by all CTC products that require log in credentials for their use.
Using a web browser (Chrome or Firefox are recommended and supported), follow this link to the Portal and use the credentials provided to your organization to log in. In order to perform all of the management functions for the content management system, the CTC account must have a minimum role of CMS Admin.
Roles and Permissions
Roles for CMS can be assigned to groups or by individual account. All role assignments are done in the portal.
Roles
CMS Library Manager:
- Can upload, update and remove content for libraries they manage
- Can use and download content from libraries for which they have been granted access
- Can write reviews on content in libraries for which they have been granted access
Contributor:
- Can use and download content from libraries for which they have been granted access
- Can write reviews on content in libraries for which they have been granted access
Consumer:
- Can use and download content from libraries for which they have been granted access
For a list of additional roles, go to Administrating the CTC Portal
Creating Libraries
Libraries can be considered a collection of groups and users. This may seem counter to the traditional definition. This is because content within the CMS is not contained in any library; content is associated to one or more libraries so that access to it can be granted by the library itself. Therefore, a library is a list of users and groups as well as references to content.
Because content can be associated to more than one library, it is more easily tracked and managed as this eliminates the need for duplication files and data.
Library Creation Using the Portal
Navigate to the CMS area using the link at the top of the portal interface. At the left, on the application drawer, use the “Manage Libraries” → Libraries interface. From here, click the button in the upper right to start the library creation.

A step-by-step instruction is available here → Creating and Managing Libraries on the Portal
Adding Content to Libraries
Using the desktop application, click “Add Content” on the left toolbar.
Begin adding content by selecting one or more libraries and tags that will be associated to the content in the batch.
Choose the method: files or folders. If choosing folders, all of the files contained within it and any sub-folders of files will be added to the batch. It is also possible to drag files or folders from Windows Explorer onto the content list.
When satisfied with the batch, click process to begin.
At the end of the batch, a log will be presented showing what was done and the result (success, warning, error). Inspect this log to verify there were not failures. The log can be saved as a spreadsheet file for later reference if desired.
NOTE Due to security concerns, the following file types are prohibited in the CMS: “.msi”, “.exe”, “.dll”, “.rar”, “.7z”
Content Resources
Certain types of Revit content depends on multiple files to appear or function as expected. The CMS offers functionality to gather the referenced files as “resources”. This enables management of not only the parent files but the subsequent files as well. When a user adds a content item with resources, the entire set of files is added as well.
This feature must be enabled in the Organization Settings area on the portal. Once enabled, content added with resource files will utilize this functionality.
Adding Content with Resources
Revit content with materials can be processed into the CMS as usual. The CMS app will detect referenced materials and discover their locations on disk. Using these references, the entire stream of files is managed throughout the lifecycle.

When the CMS detects material resources, additional tabs will be displayed on the 'Add Content' list:

In the embedded content tab, the source and library of the associated resource is displayed. From here, the destination library can be overridden by selecting an alternate. If no selection is made, the resource will use the librarie selections from the content.

The External Files tab displays the images that are specified for the materials. These files, if local, can conveniently be mapped to a different destination if desired.


Updating Content
Any content that is uploaded will be checked against content already in the system. If a file is found with the exact same name, it will automatically be considered an update of what is in the system already.
To update content, follow the same steps as adding. In this way, new content and updates can be done in the same batch.
From the Context Menu
Right-click on a piece of content and choose “Update”. This will add the selected content to the “Add Content” list for processing.

NOTES For Revit families:
- if more than one version is available to update, a prompt will show a list to choose which version to update. Revit must be running to process the content list.
- to Update Model Elements (Views, System Families) you must open the file and re-add the families from the model
Content Updates Using a Spreadsheet
Content can be modified in the following ways by using the Download/Upload spreadsheet function:
- Modify the source path
- Modify the library associations
In the Add Content view:
- Click Export Content to receive a spreadsheet of the selected libraries via email.
- After editing desired properties, click Update to upload and process the changes.

NOTE: Update does the processing in a queued service. It may take some time to process and return the updated results.
Automatic Content Synchronization
Content can be automatically added or updated from a folder that is being monitored.
In Admin Tasks
- Set the desired library
- Specify the folder to monitor, press Start Synchronizing.
- Add new or updated content to the folder. Processing will begin automatically.
- Content that was already present in the folder before pressing Start will not be processed.

Removing Content
Perform a search to find the content items to remove. Select them (CTRL and SHIFT click for multiple) and right-click to bring up the context menu. Choose delete from the menu.
Content Processor Settings
In Add Content, click the Content Processor Settings button.

Content Settings are applied to all processing done for the organization. The properties on this tab are gathered during processing and stored in the data in the CMS. Changes made here will be applied the next time content is processed.

Content Attachments
Add files such as PDF, images, text, etc. as attachments to content. This is useful when more information about a content item is needed.
Select the content item, open the details pane and expand “Attachments”.

Files and links to files or internet locations can be attached to content.
Attachments can also be applied to multiple content items at the same time. When selected, simply right click and choose 'Add Attachment'.
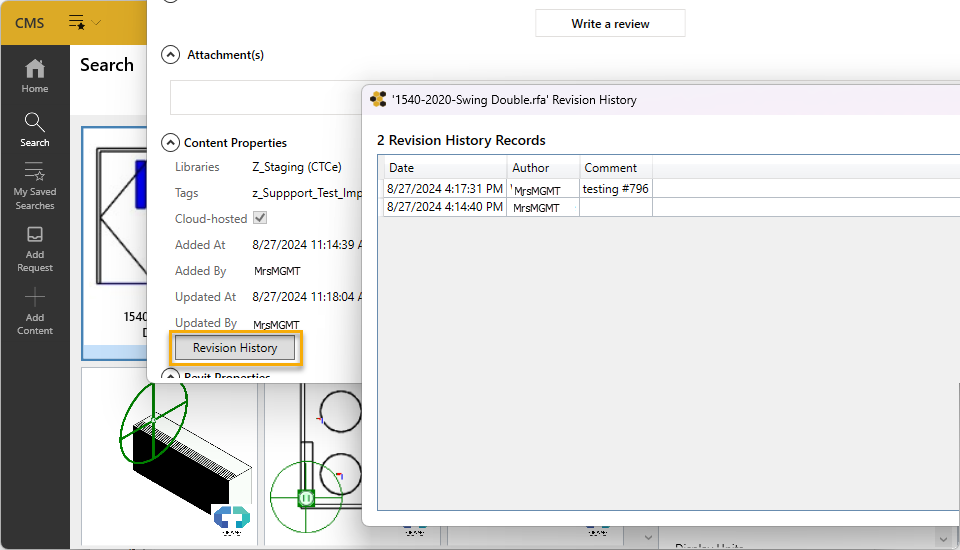
Content Revision Comments
When adding content, a comment can optionally be added to each item in the list. Each time a piece of content is updated, the comment history will be appended with the new comment. This can be useful for communicating what may have changed for each version.
Adding Revision Comments
The first time a piece of content is added will be the first comment in the history. Use the “Add” button in the comment column of the Selected Content table.

When updating content, each new comment will be shown to the user in a list on the content details page under “Revision History”.
Managing Tags
The tagging system of the CMS can greatly improve the search experience by allowing Tag Admins to create relationships to content under several more logical or natural terms. While descriptive naming and metadata properties are helpful in this respect, it is not always as intuitive or feasible to rely solely on this convention.
Tags can create data relationships like this, for example: 01_hc_2302_HP_phleb.rfa with tags “healthcare equipment, phlebotomy, lab equipment” is much more easily found and doesn’t require decoding of a naming convention.
Creating and Editing Tags
Tag creation and editing is performed in the Portal under the CMS area. To create and edit tags, the role of Tag Admin or higher must be assigned.
Create a tag:
- Click on the plus icon in the upper right.
- Minimally, give the tag a name.
- Click “CREATE” for just one or “CREATE AND NEW” to save it and quickly create another.
Edit a tag:
- click the pencil icon at the start of the row for the tag.
Delete tags:
- check the boxes for the row(s) of the tag(s) to delete.
- click the large X icon next to the add tag button.
Assigning Tags to Content
Right-click on any content in the CMS application and choose ‘Manage Tags’ → ‘Assign Tags’. To assign the same tag to multiple content in a single step, shift-select or ctrl-select the items, then use the same procedure.
Company Saved Searches
Similar to user saved searches in concept, a CMS admin can create saved searches for the entire organization to use.
Create the search as described here: Saved Searches. In the last step, check the box labeled “Share with organization”.
This will expand the permissions control. Use the ‘Select Groups’ function to add groups of users that should be able to see and use the search.

Content Reviews
If enabled (see Organization Settings), users of the CMS can create reviews and ratings on content. Reviews can enhance the user experience and help to boost the relevancy of items if the rating is good.
CMS Settings
Organizational Settings
On the Portal, log in as a user with CMS admin role or higher. Under the CMS area, find Settings → Organization on the left navigation drawer.
- [✔] Notify if a software update is available – globally disable update notifications for the organization user with roles less than CMS Admin
- [✔] Enable content requests – determines whether the content request system is available to any users from the CMS application
- Requests URL - if the link to content requests is enabled, specifying a URL here to an alternative content request system will direct users to it from within the CMS application. A blank value directs users to the default request system.
- Cache and Logs – the paths set here determine where temporarily stored content and logs should be kept and how old items should be before automatic clean-up
Library Settings:
- [✔] Allow sharing invitations to other organizations – uncheck this to disable external invites for all users
- [✔] Allow public libraries – uncheck to disable public library creation for all users
- [✔] Auto filter for active design app version - only show Revit content that can be used by the currently being used version of Revit
- [_] Auto update search results to match design app - when switching between design applications, perform the same search again but filter by the current version
- [✔] Send an email notification when an external user is invited to a library - external users will be notified by email that they have been granted access
Content Settings:
- [✔] Allow contributor comments and ratings – uncheck to disable the review system
- [✔] Allow contributors to assign tags - enable users with contributor roles to tag content with existing tags
- [✔] Allow cloud content caching – uncheck to disable the upload of files for the content
- [✔] Prefer cloud content – always attempt to download files from the cloud before using local paths
- [✔] Allow downloads – uncheck to prevent users from directly downloading content files
- [✔] Allow clear content – uncheck to prevent users from clearing their content cache in the CMS interface
- [_] Disable Automatic Preview Generation - when processing, force the default windows preview image to be used
- [_] Use Existing Preview - if it exists and is defined in a family, use this instead.
- [_] Suppress security dialog on AutoCAD content loading
- [_] Enable resources management for Revit content - CMS will detect and gather materials and other extraneous items with the content
- [_] Enable automatic upgrades for Revit content - When enabled, any new or updated Revit content will automatically have higher versions generated in the cloud. NOTE: if choosing this option, be aware that the lowest version will become the master. Always choose to update the lower version to maintain this relationship.
Once the options here are saved, the new settings will take effect the next time each user starts the CMS application.
User Settings
These settings are applied as defaults for users that have not yet logged in to the CMS application.
- Log Frequency - Determines the amount of detail that will be logged to the user workstation while running the CMS application. Errors only recommended. Change to verbose for troubleshooting.
- [✔] Notify if update is available on login - when a user logs in to the CMS, determines whether a message notifying them of an update should be presented
- [✔] Display type selector dialog when loading Revit family - allow a user to select one or more types when using Revit content from the CMS
- [✔] Display view selector dialog when loading Revit sheets - allow a user to select one or more drafting views when using Revit sheets from the CMS
- Default Sort By - sets the default sort selection when search results are returned
- Preview Image Size in Pixels - how large the “thumbnail” is when presented in the item lists