Table of Contents
Family Exporter
The Family Exporter adds automation and flexibility when saving Revit families from a project to .rfa files. Family Exporter greatly simplifies the process of selecting families in a project and can create folders as well as append and prepend file names while it exports.
Starting Family Exporter
Located in the “CTC Software” tab, the “Family Exporter” button can be found on the CTC BIM Batch Suite panel.
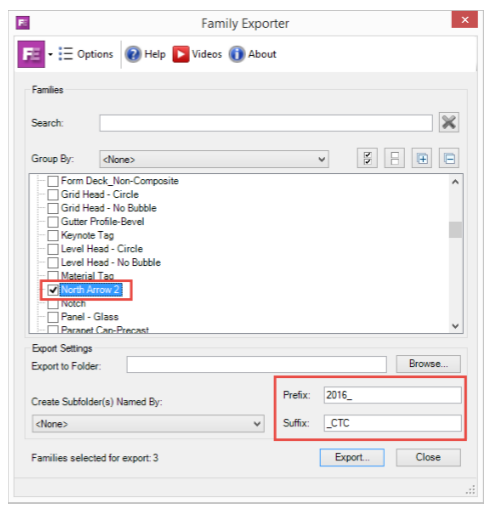
The Family Exporter main window:
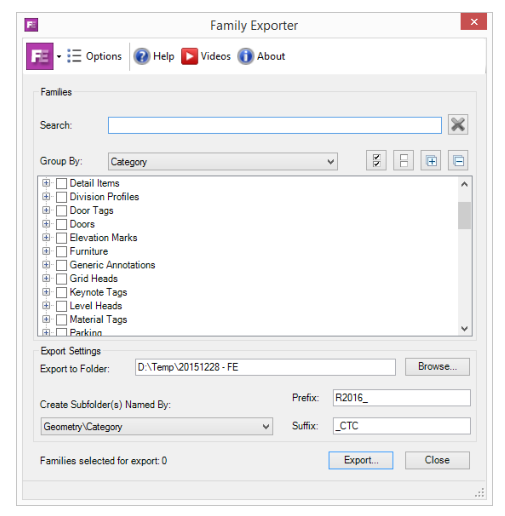
Choosing families to export
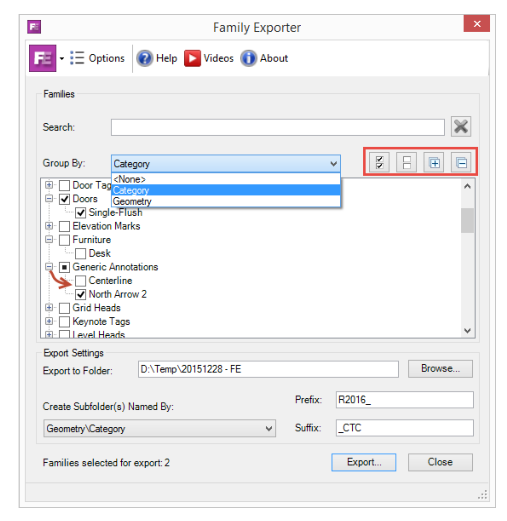
The exportable families contained in the currently open project will be shown according to the Group By: selection. The default, ‘Category’, displays the families grouped in the tree view according to their category. Simply click on the ‘+’ next to the category to expand it, revealing the families of that category. Additional grouping options are <None> (shows all families without tree) and by Geometry (annotation or model).
The ‘Check all/none’ and ‘Expand all/none’ buttons to the right of the grouping drop-down also aid in quick selection of items in the tree view.
To further refine the list of families in the tree, use the ‘Search:’ text box. The list of families will be reduced to only those whose names match the text typed into the search box. To see all of the families displayed again, click the ‘Clear Search’ icon to the right of the search box.
The selections made will be retained until after the export has completed successfully.
Export Settings
When exporting families from a project, the Family Exporter places the files in the folder specified in ‘Export to Folder’. Click browse to choose the location. In the browser window, select the location of the destination folder. If desired, use the ‘Make New Folder’ button in the browser window to create and name new folders in which to store the exported families. This location will become the top level folder where, if specified in the ‘Create Subfolder(s) Named By’ drop-down, additional folders will be created according the chosen option.
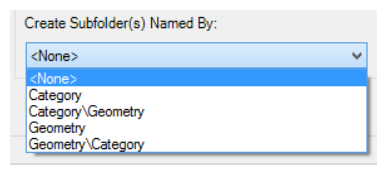
- `<None>` - All families will be exported to the ‘Export to Folder’ location
- Category – Creates subfolders corresponding to the categories of the families.
- Category\Geometry – Creates folders of categories then either Model or Annotation within them
- Geometry – Creates either Model or Annotation depending upon the families exported
- Geometry\Category – Creates either Model or Annotation folders with subfolders of family categories within them
Important: Ensure that the Windows account with which the Family Browser is being run has sufficient permissions on the destination folder so that it can create and write folders and files.
Using the ‘Prefix’ and ‘Suffix’ text boxes, it is possible to prepend or append the family file names as they are being exported. For example, the prefix “2016_” and suffix “_CTC” will be included in each family file’s name resulting in a name like this: “2016_North Arrow 2_CTC.rfa”.
Safe characters are: ` _ - + = # & () [] ! and space `
Leave the text boxes empty for no added characters to the family names. The families will be named exactly as they appear in the Revit project and the selection tree.
Exporting the Families
The number of families to be exported will be shown in the lower left corner of the main window. When ready to begin, click ‘Export…’. The add-in will confirm the operation and begin. When the operation is successful, a log will be shown which can be saved to a spreadsheet if desired.
Important: The add-in examines the export destination during the export process to determine if a file with the same name exists. To control how Family Exporter handles existing destination files, see ‘Family Exporter Options’.
Family Exporter Options
The options window shows options related to the way the add-in handles the export process. Although the source project is never modified or saved by the Family Exporter, the potential to overwrite previously exported families exists. In order to prevent unintentionally overwriting files, the default behavior is to warn a user if the ‘Overwrite… ‘ option has been checked prior to exporting. Uncheck the ‘Warn’ to prevent the add-in from presenting the warning message prior to exporting.
Examples
To prevent overwriting any files that exist in the destination folder with the exact same name (case insensitive), deselect “Overwrite existing family files” or specify a different suffix and prefix for all of the exports.
To overwrite the destination files with the exported versions, check “Overwrite existing family files” and specify the exact same prefix/suffix combination.
To prevent overwrites by verifying each exported family, check “Show confirmation message when exporting” Note: Family Export will continue to export any selected families that do not exist in the destination.